How to Wire a Network
Twisted Pair Cabling
Twisted-pair (sometimes known as 10BaseT) is ideal for small, medium, or large networks that need flexibility and the capacity to expand as the number of network users grows.
We highly recommend using 10BaseT cabling for its amazing flexibility and reliability.
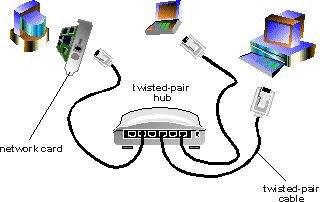
In a twisted-pair network, computers are arranged in a star pattern. Each PC has a twisted-pair cable that runs to a centralized hub. Twisted-pair is generally more reliable than thin coax networks because the hub is capable of correcting data errors and improving the network’s overall transmission speed and reliability. Also known as uplinking, hubs can be chained together for even greater expansion.
There are different grades, or categories, of twisted-pair cabling. Category 5 is the most reliable and widely compatible, and is highly recommended. It runs easily with 10Mbps networks, and is required for Fast Ethernet. You can buy Category 5 cabling that is pre-made, or you can cut & crimp your own.
Category 5 cables can be purchased or crimped as either straight-through or crossed. A Category 5 cable has 8 thin, color-coded wires inside that run from one end of the cable to the other. Only wires 1, 2, 3, and 6 are used by Ethernet networks for communication. Although only four wires are used, if the cable has 8 wires, all the wires have to be connected in both jacks.
Straight-through cables are used for connecting computers to a hub. Crossed cables are used for connecting a hub to another hub (there is an exception: some hubs have a built-in uplink port that is crossed internally, which allows you to uplink hubs together with a straight cable instead).
In a straight-through cable, wires 1, 2, 3, and 6 at one end of the cable are also wires 1, 2, 3, and 6 at the other end. In a crossed cable, the order of the wires change from one end to the other: wire 1 becomes 3, and 2 becomes 6.
To figure out which wire is wire number 1, hold the cable so that the end of the plastic RJ-45 tip (the part that goes into a wall jack first) is facing away from you. Flip the clip so that the copper side faces up (the springy clip will now be parallel to the floor). When looking down on the coppers, wire 1 will be on the far left.